I’ve had Google Analytics since around the time I started this blog over two years ago. I’ve explored most of the reports, check it regularly, and fancied myself a competent GA user. That is, until I discovered one new-to-me Google Analytics report that kind of blew my mind.

The uncommon report you, too, may never have viewed before? “Search Engine Optimization.” The reason you may not have viewed it (and why I hadn’t, either), is because you need to “enable Webmaster tools” to gain access to it. This step is actually quite simple, but if you’re anything like me, the fact that an extra step is required is enough to make you disinterested in it altogether. #aintnobodygottimeforthat
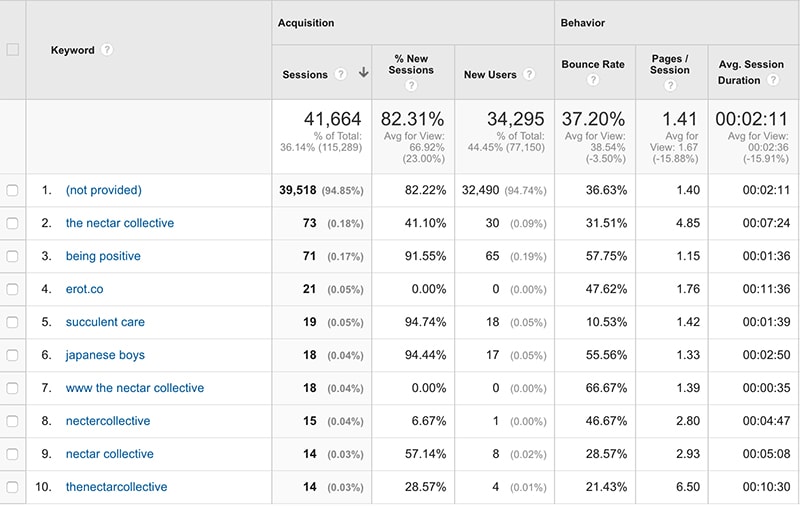
Now, if you’ve ever explored Google Analytics, then you might have found a page that looks like this:

This is a list of the top search terms that lead people to my site. But oh? 95% of them are listed as “not provided,” meaning that until now, I had no idea what they were. In today’s tutorial, I’m going to show you how to find out exactly what those mysterious terms are and how you can use them to drive more traffic to your own site.
Want to know why the Search Engine Optimization (SEO) reports will become your new BFF? Ever wonder the exact terms people search for when they discover your site? Wishing more people would click over from search engines? I’ve got you covered with today’s Google Analytics tutorial perfect for bloggers or online business owners who want to up-level their website’s effectiveness. There’s also a free worksheet to help you along the way!
1. First things first, you’ll need to enable the function.
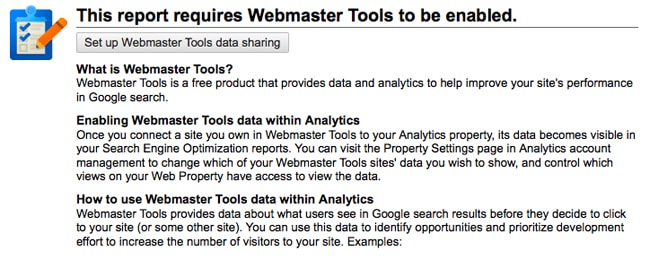
Once you login to your Google Analytics account, navigate yourself to Acquisition >> Search Engine Optimization >> Queries. If this is your first time on this section, you’ll be met with a page that looks like this:

Click “Set up Webmaster Tools data sharing” and follow the steps to complete the set up. The steps are simple and should only take a couple minutes. Once you’re finished, you should now gain access to the “Search Engine Optimization” pages.
2. Dissecting the Queries page
On the left, your Google Analytics Queries page will list your top keywords in order of impressions. These are the exact terms that people are using to find particular posts on your site. They can be ordered by the following variables:
Impressions: Impressions are the number of views your post received on a search engine results page. For example, if someone Googled “entrepreneur books” and you have a popular post called, “My Favorite Books for Entrepreneurs,” then your post may show up on the search engine page for that term. Therefore, the number of “impressions” isn’t the number of people who clicked over to read your post. It’s just the number of times your blog’s post appeared in the list of other posts on a search engine results page.
Clicks: This refers to the number of times someone actually clicked your post (from the search engine results page) in order to read it.
Average Position: This is a fun one. It refers to the exact ranking that your post has on Google when someone searches for a particular keyword. Ideally, you want this number to be as close to “1” as possible, especially for keywords that are particularly important to your blog or business. “1” means that your post is the very first result.
Don’t worry if your numbers are looking a bit higher (or even a LOT higher) than the mystical “1.” Firstly, search engine optimization (SEO) takes time to organically build up. If you just published a post that you think has great potential, you will still likely need several months before it gets strong notice from search engines. Secondly, in this post I’m going to share ways to increase this search engine ranking. You’re in the right place.
CTR: Lastly, CTR stands for Click-Through Rate, or the rate in which users click over to read your post from search engine results. The exact formula Google shares is “Clicks/Impressions x 100 = CTR.” A fantastic CTR is in the ball-park of 50%. However, that can be difficult to achieve, especially with popular keywords. Instead, you’ll ideally want a CTR of 15-20% for your most popular keywords, especially if they directly relate to your website (even that is ambitious!).

3. Using the “Queries” Page to Find Your Most Popular + Relevant Keywords
Now that we’ve defined all of the data and terms on this page, it’s time to actually put it to use in a way that will help you grow your website’s traffic. Essentially, we’re going to uncover the following things:
- How to rank even higher for keywords that are relevant to your brand.
- Which posts are showing up the most in search engine results.
- How to improve your CTR so that once you DO rank more highly in search engines, people actually feel inclined to click over and read your post.
First of all, you might see that your top keywords are ones that aren’t very relevant to your site’s main focus. As an example, some of my top keywords are posts about “succulent care” and “Tokyu Hands,” which is a store in Japan. Those are very old posts that I wrote when I first started this blog, but which are no longer relevant to my audience. Even though they receive the highest amount of impressions, I would skip them, because receiving a new reader who’s interested in succulents isn’t going to help me grow my business.
Instead, go through the list of “queries” to find ones that are relevant to your blog or business. (Note: you can view more queries by clicking the “show rows” button at the bottom of the page). Some of them might surprise you and many of them will likely belong to posts you wrote months or years ago — like I mentioned, SEO takes time, so older posts tend to rank higher than brand new ones. Record any queries with a CTR of less than 10% on a piece of paper or download my free worksheet here.
Next, record the other information for these keywords — impressions, clicks, average position, and CTR. This will help you to see which keywords are hustlin’ and which ones are falling flat. You can ignore the “Landing Page” section of the worksheet until the next step.
4. Adding the “Landing Pages” data
Finally, if you click Acquisition >> Search Engine Optimization >> Landing Pages, then you’ll see a page very similar to your queries page. The only difference is that instead of showing a list of your most popular keywords, it will show a list of the most popular posts and pages on your website. Likely, your most popular posts will directly relate to your most popular keywords. For example, if one of your popular keywords is “chocolate cake,” then it’s probable that your “Best Chocolate Cake” post will be one of your most popular posts within your “Landing Pages” data.
Using your worksheet, record the popular posts next to their related keyword. You can do this for as many posts and keywords as you’d like, but I’d work on the most popular and relevant ones first. Your worksheet should now be mostly filled up with information about your landing pages and keywords.

5. Putting it all together to grow your blog or website’s traffic
Phew! I know this post is feels very data-heavy, but I promise you that this process is very easy and can have a huge effect on your blog’s growth and traffic. Stay with me, friends, we’re almost done!
Now that we’ve recorded data from your Queries and Landing Pages sections, it’s time to analyze it and find ways for you to improve. Looking at your completed worksheet, you should be able to see which keywords/landing pages have the lowest click-through rates (CTR). Time to work some magic!
If you have CTRs that are less than 10%, then it’s likely because of one of these problems:
- Your post title is not catchy or interesting enough.
- Your meta description (the few sentences that appear below your post title in search engine results) is not catchy or interesting enough.
To fix these, just edit them! You can easily edit your post titles. To edit your meta description, you can use a WordPress plugin like Yoast. Think about a title that is descriptive, uses your keyword, and would make someone want to click your post. For the record, posts that begin with phrases like “How to…” or “5 Ways…” tend to receive more clicks.
Similarly, if you want to show up more in search engine results for a particular term, then try these tips:
- Add your keyword (organically) throughout the related “landing page” more often. Simply edit the text to add your keyword in a few more places.
- Make sure your keyword is used in the title, meta description, text of the post, and URL (if possible).
- Write more posts about that keyword/query topic and link to them within your posts.
- Lengthen your popular “landing page” posts to include even more valuable information. Google rewards posts that are in-depth.
- Share these posts on social media in the hopes that others will repost them on their own social media or mention them in a blog post on their site. When other sites link to your site, it boosts your SEO.
6. Lastly, figure out which keywords you WANT to rank for in search engines.
You’ll want to select keywords that are relevant to your brand and will likely bring you traffic and sales. You can search for these keywords on the Queries page to see if you’re already getting traffic from them and then use the steps above to improve the number of clicks and amount of traffic you receive for a particular term.
This process may sound complicated if you’re reading through this for the first time, but following the steps above is actually pretty simple and quick. It should show you which keywords are bringing you the most traffic and which ones could bring you a lot of traffic if you tweak certain posts on your site. I hope you enjoyed this tutorial!


